Webアプリケーションのセキュリティ対策は、現代の開発において避けては通れない重要なテーマです。Javaのエコシステムにおいて、Spring Securityはデファクトスタンダードなセキュリティフレームワークとして広く利用されています。しかし「なんとなく動いている」「設定の意味がわからない」という方も多いのではないでしょうか。
この記事では、Spring Securityの基本的なアーキテクチャ・仕組み・使い方を図解を交えながら丁寧に解説します。Spring Boot 3 / Spring Security 6系の最新の書き方にも対応しています。以下のような方に向けた記事です。
- Spring Securityを初めて使う方
- 設定は動いているが内部の仕組みが理解できていない方
- WebSecurityConfigurerAdapterから新しい書き方に移行したい方
Spring Securityとは何か
Spring Securityは、Springフレームワーク上で動作するセキュリティフレームワークです。主に以下の2つの機能を提供します。
| 機能 | 説明 |
|---|---|
| 認証(Authentication) | 「あなたは誰ですか?」を確認する処理。ユーザー名とパスワードの照合など。 |
| 認可(Authorization) | 「あなたはこのリソースにアクセスできますか?」を確認する処理。ロールや権限による制御。 |
Spring Securityはサーブレットフィルター(Servlet Filter)の仕組みをベースに構築されています。HTTPリクエストがアプリケーションに到達する前後に、複数のフィルターが順番に実行される構造です。
Spring Securityの全体アーキテクチャ
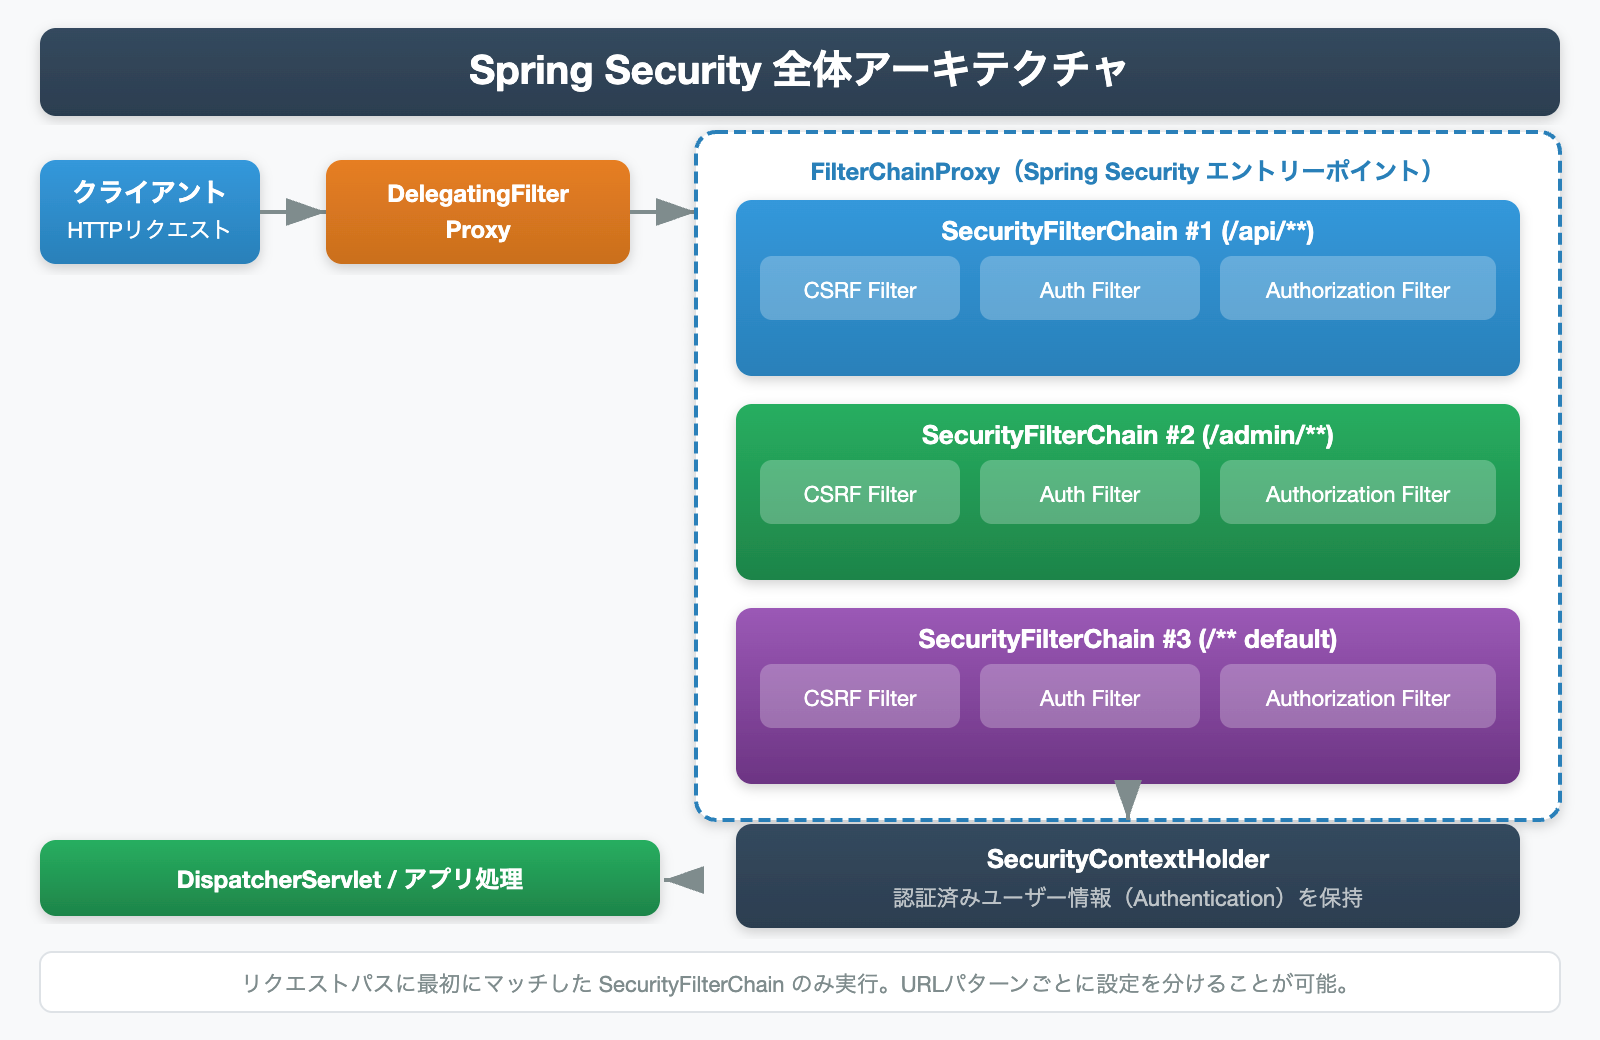
Spring Securityの全体像は上図のとおりです。クライアントからのHTTPリクエストは、次の順序で処理されます。
- DelegatingFilterProxy:Springの管理外にあるサーブレットコンテナと、Springが管理するBeanを橋渡しする役割を持つフィルターです。
- FilterChainProxy:Spring Securityのエントリーポイント。登録されたSecurityFilterChainの中から、リクエストのURLパスに最初にマッチするものを選択し、処理を委譲します。
- SecurityFilterChain:実際のセキュリティ処理を行うフィルターの集合体。URLパターンごとに複数定義でき、CSRF対策・認証・認可などを担当する各フィルターが順番に実行されます。
- SecurityContextHolder:認証済みユーザーの情報(Authenticationオブジェクト)を保持するコンテナ。スレッドローカルに保存されます。
ポイント:FilterChainProxyは登録されたSecurityFilterChainのURLパターンを上から順に評価し、最初にマッチしたチェーンのみを実行します。一度マッチすると残りのチェーンは実行されません。
SecurityFilterChainの主要フィルター
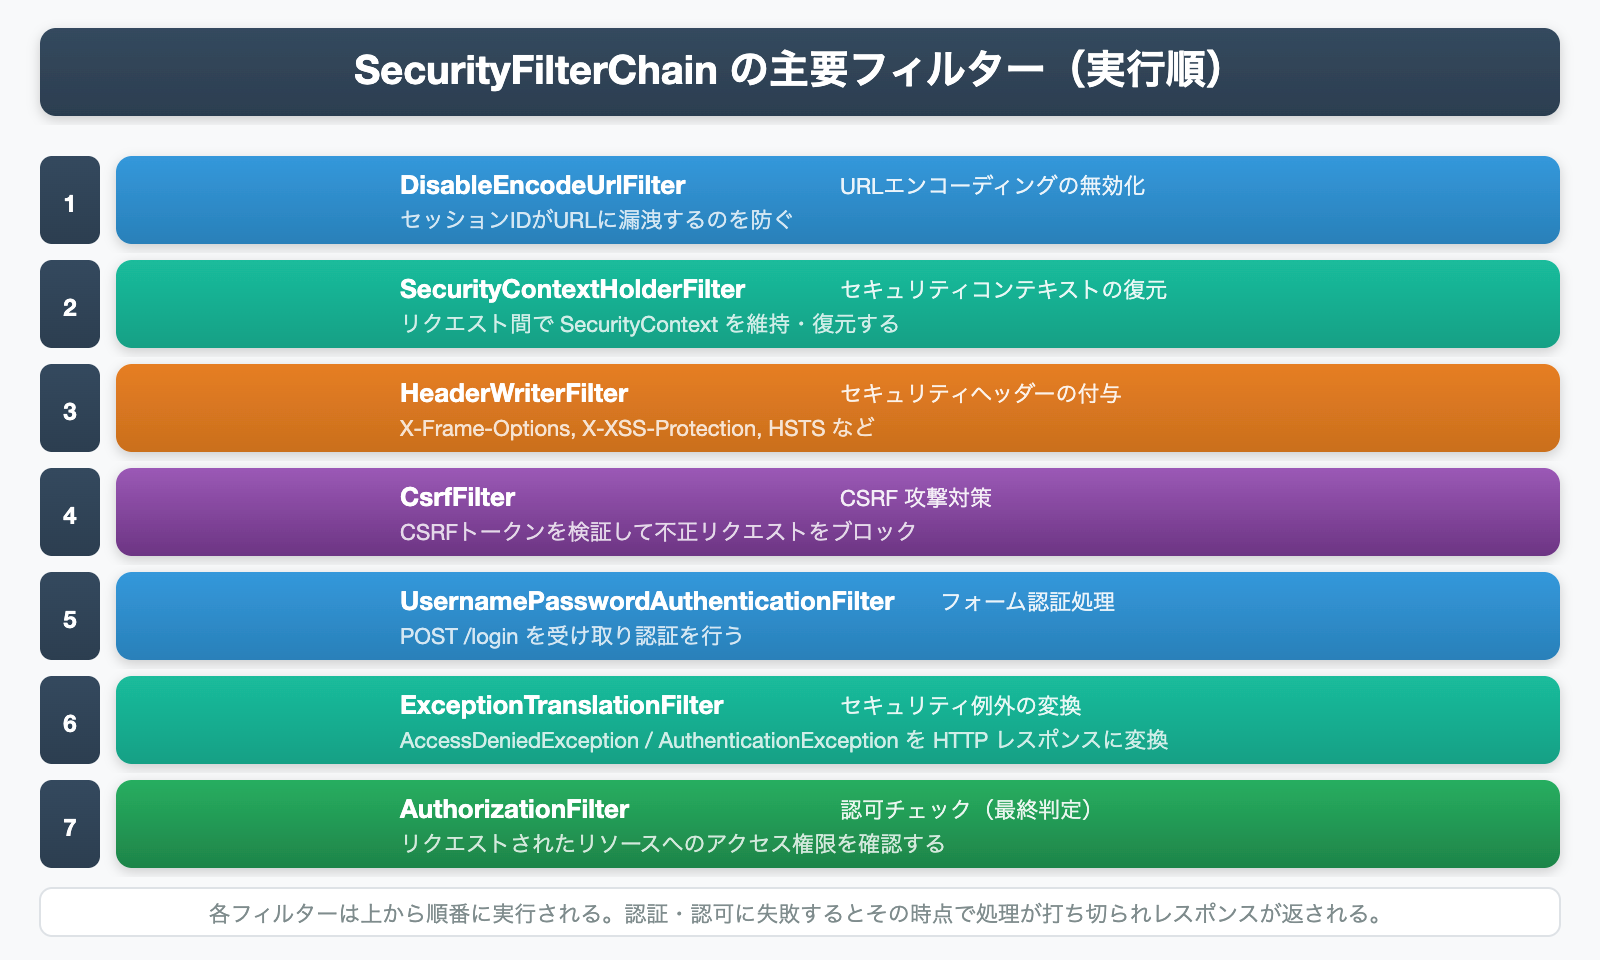
SecurityFilterChainに登録されているフィルターは数十種類に及びますが、特に重要なものを上図に示しました。各フィルターは上から順に実行され、途中で認証・認可に失敗すると処理が打ち切られます。
| フィルター名 | 主な役割 |
|---|---|
| DisableEncodeUrlFilter | URLへのセッションIDの埋め込みを無効化し、情報漏洩を防ぐ |
| SecurityContextHolderFilter | リクエスト開始時にSecurityContextを復元し、終了時に保存する |
| HeaderWriterFilter | X-Frame-Options・X-XSS-Protection・HSTSなどのセキュリティヘッダーを付与する |
| CsrfFilter | CSRFトークンを検証し、クロスサイトリクエストフォージェリ攻撃を防ぐ |
| UsernamePasswordAuthenticationFilter | POST /loginリクエストを受け取り、フォーム認証を処理する |
| ExceptionTranslationFilter | セキュリティ例外(AccessDenied・AuthenticationException)をHTTPレスポンスに変換する |
| AuthorizationFilter | 認証済みユーザーのロール・権限をチェックし、アクセスを許可または拒否する |
認証フローの仕組み
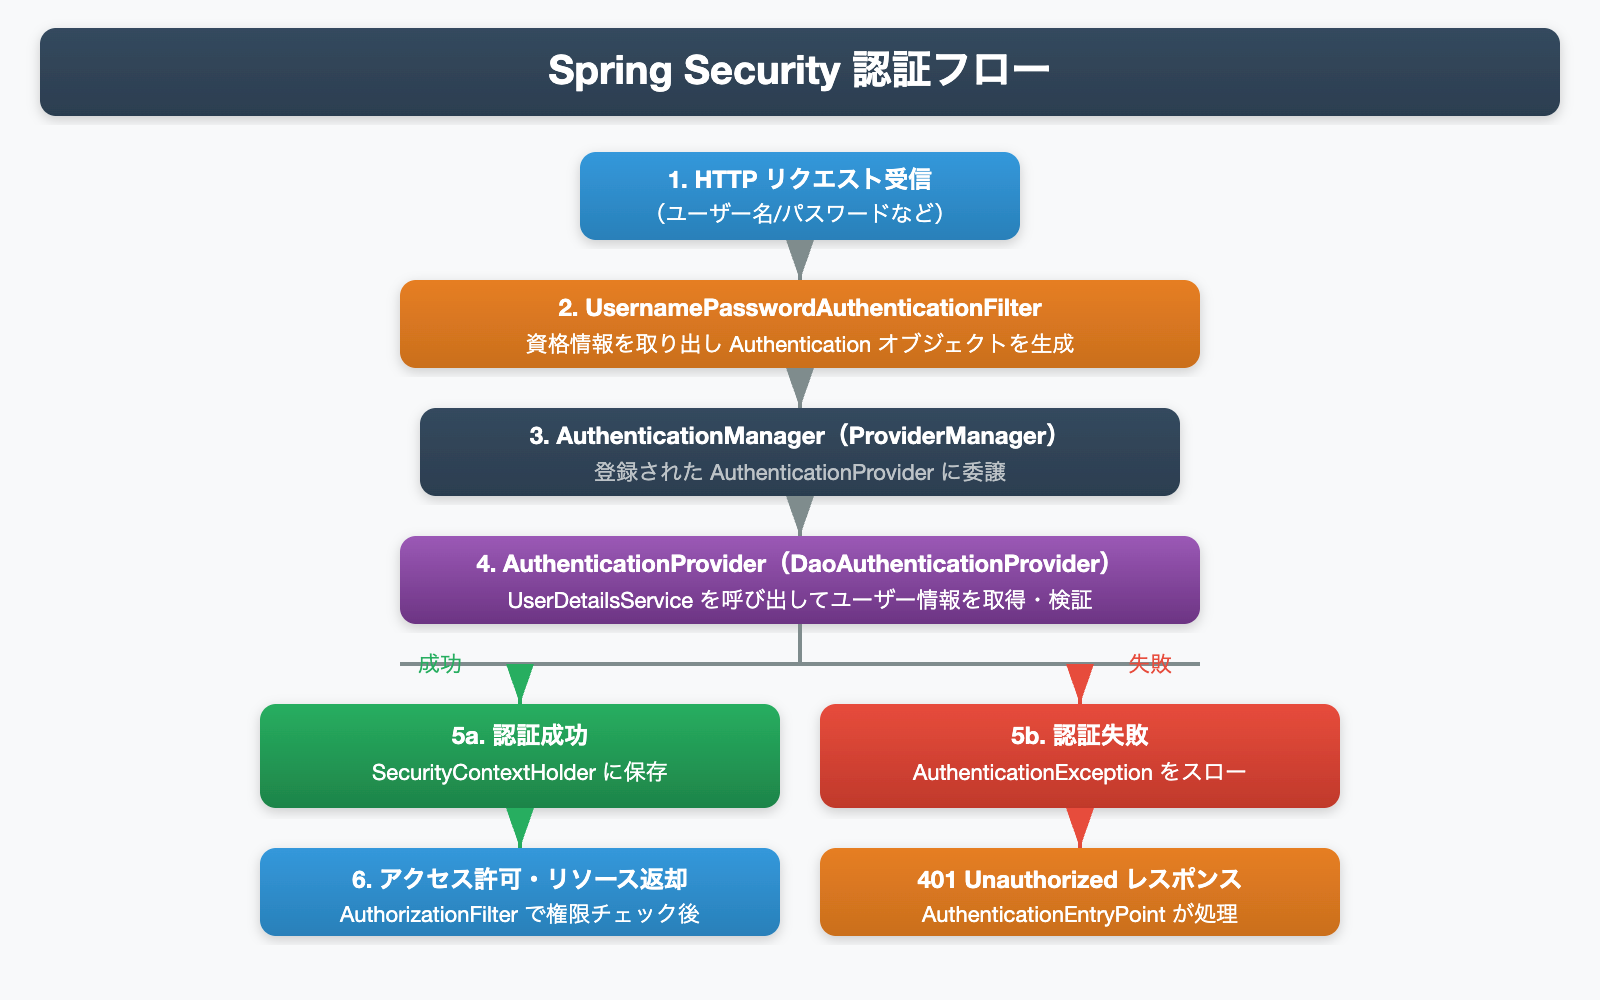
Spring Securityの認証処理は、複数のコンポーネントが連携して行われます。上図の流れを詳しく見ていきましょう。
- HTTPリクエスト受信:クライアントがユーザー名とパスワードをPOSTで送信します。
- UsernamePasswordAuthenticationFilter:リクエストからユーザー名・パスワードを取り出し、未認証の
Authenticationオブジェクトを生成します。 - AuthenticationManager(ProviderManager):認証の窓口役。登録された
AuthenticationProviderリストに処理を委譲します。 - AuthenticationProvider(DaoAuthenticationProvider):
UserDetailsServiceを呼び出してDBからユーザー情報を取得し、パスワードを検証します。 - 認証結果の分岐:成功時は認証済みの
AuthenticationをSecurityContextHolderに保存。失敗時はAuthenticationExceptionをスローし、401レスポンスを返します。
認証に関わる主要クラスの役割
| クラス・インターフェース | 役割 |
|---|---|
| SecurityContextHolder | 現在のスレッドに紐づくSecurityContextを保持するコンテナ。静的メソッドで簡単にアクセスできる。 |
| SecurityContext | Authenticationオブジェクトを格納するコンテキスト。 |
| Authentication | 認証情報を表すインターフェース。プリンシパル・資格情報・権限リストを持つ。 |
| AuthenticationManager | 認証処理のメインインターフェース。実装クラスはProviderManager。 |
| ProviderManager | AuthenticationManagerの標準実装。複数のAuthenticationProviderに順番に委譲する。 |
| AuthenticationProvider | 実際に認証を行うインターフェース。DBやLDAPなど異なる認証方式ごとに実装できる。 |
| UserDetailsService | ユーザー名からUserDetailsを取得するインターフェース。DB認証時に実装が必要。 |
| UserDetails | 認証・認可に必要なユーザー情報を表すインターフェース。 |
Spring Boot 3対応:SecurityFilterChainのBean設定
Spring Security 5.7以降、WebSecurityConfigurerAdapterは非推奨となりました。Spring Boot 3 / Spring Security 6では、SecurityFilterChainをBeanとして定義するスタイルが推奨されています。
注意:WebSecurityConfigurerAdapterを継承する旧スタイルの設定は、Spring Boot 3では使用できません。新しいBeanスタイルへの移行が必須です。
まず、Spring BootプロジェクトにSpring Securityを追加します。
<!-- pom.xml(Maven)-->
<dependency>
    <groupId>org.springframework.boot</groupId>
    <artifactId>spring-boot-starter-security</artifactId>
</dependency>次に、SecurityFilterChainを設定するConfigクラスを作成します。
import org.springframework.context.annotation.Bean;
import org.springframework.context.annotation.Configuration;
import org.springframework.security.config.annotation.web.builders.HttpSecurity;
import org.springframework.security.config.annotation.web.configuration.EnableWebSecurity;
import org.springframework.security.web.SecurityFilterChain;

@Configuration
@EnableWebSecurity
public class SecurityConfig {

    @Bean
    public SecurityFilterChain securityFilterChain(HttpSecurity http) throws Exception {
        http
            // CSRFを無効化(REST APIの場合など)
            .csrf(csrf -> csrf.disable())
            // リクエストごとのアクセス制御
            .authorizeHttpRequests(auth -> auth
                .requestMatchers("/public/**").permitAll()       // /public/** は誰でもアクセス可
                .requestMatchers("/admin/**").hasRole("ADMIN")   // /admin/** はADMINロールのみ
                .anyRequest().authenticated()                    // その他は認証済みのみ
            )
            // フォームログインの設定
            .formLogin(form -> form
                .loginPage("/login")         // カスタムログインページ
                .defaultSuccessUrl("/home")  // ログイン成功後のリダイレクト先
                .permitAll()
            )
            // ログアウトの設定
            .logout(logout -> logout
                .logoutSuccessUrl("/login?logout")
                .permitAll()
            );

        return http.build();
    }
}
UserDetailsServiceを実装してDB認証を行う
実際のアプリケーションでは、DBに保存されたユーザー情報を使って認証を行います。そのためにはUserDetailsServiceインターフェースを実装します。
import org.springframework.security.core.userdetails.User;
import org.springframework.security.core.userdetails.UserDetails;
import org.springframework.security.core.userdetails.UserDetailsService;
import org.springframework.security.core.userdetails.UsernameNotFoundException;
import org.springframework.stereotype.Service;

@Service
public class CustomUserDetailsService implements UserDetailsService {

    private final UserRepository userRepository; // JPA Repositoryなど

    public CustomUserDetailsService(UserRepository userRepository) {
        this.userRepository = userRepository;
    }

    @Override
    public UserDetails loadUserByUsername(String username)
            throws UsernameNotFoundException {
        // DBからユーザーを取得
        AppUser appUser = userRepository.findByUsername(username)
            .orElseThrow(() -> new UsernameNotFoundException(
                "ユーザーが見つかりません: " + username));

        // Spring SecurityのUserDetailsオブジェクトに変換して返す
        return User.builder()
            .username(appUser.getUsername())
            .password(appUser.getPassword()) // BCryptでハッシュ化済みのパスワード
            .roles(appUser.getRole())        // 例: "USER", "ADMIN"
            .build();
    }
}パスワードのハッシュ化:DBに保存するパスワードは必ずBCryptなどでハッシュ化してください。PasswordEncoderをBeanに登録し、BCryptPasswordEncoderを使うのがベストプラクティスです。
PasswordEncoderは以下のようにBeanとして定義します。
import org.springframework.context.annotation.Bean;
import org.springframework.context.annotation.Configuration;
import org.springframework.security.crypto.bcrypt.BCryptPasswordEncoder;
import org.springframework.security.crypto.password.PasswordEncoder;

@Configuration
public class PasswordConfig {

    @Bean
    public PasswordEncoder passwordEncoder() {
        return new BCryptPasswordEncoder();
    }
}
メソッドレベルセキュリティ(@PreAuthorize)
URLパターンによる制御に加えて、サービス層のメソッドに直接アノテーションで権限制御を行うことも可能です。@EnableMethodSecurityを有効にすることで利用できます。
// 設定クラスでメソッドセキュリティを有効化
@Configuration
@EnableWebSecurity
@EnableMethodSecurity // これを追加
public class SecurityConfig {
    // ... SecurityFilterChainのBean定義
}

// サービス層でのアノテーション使用例
@Service
public class AdminService {

    // ADMINロールを持つユーザーのみ実行可能
    @PreAuthorize("hasRole('ADMIN')")
    public List<User> getAllUsers() {
        return userRepository.findAll();
    }

    // 認証済みユーザーであれば実行可能
    @PreAuthorize("isAuthenticated()")
    public UserProfile getMyProfile(String username) {
        return userRepository.findByUsername(username)
            .map(UserProfile::from)
            .orElseThrow();
    }
}
現在のログインユーザー情報を取得する方法
コントローラーやサービス層でログイン済みのユーザー情報を取得するには、SecurityContextHolderか@AuthenticationPrincipalアノテーションを使います。
import org.springframework.security.core.annotation.AuthenticationPrincipal;
import org.springframework.security.core.userdetails.UserDetails;
import org.springframework.web.bind.annotation.GetMapping;
import org.springframework.web.bind.annotation.RestController;

@RestController
public class UserController {

    // 方法1: @AuthenticationPrincipal(推奨)
    @GetMapping("/me")
    public String getMyInfo(@AuthenticationPrincipal UserDetails userDetails) {
        return "ログインユーザー: " + userDetails.getUsername();
    }

    // 方法2: SecurityContextHolderから直接取得
    @GetMapping("/me2")
    public String getMyInfo2() {
        var authentication = SecurityContextHolder.getContext().getAuthentication();
        return "ログインユーザー: " + authentication.getName();
    }
}
まとめ
Spring Securityの基本的なアーキテクチャと使い方を解説しました。ポイントをまとめます。
- Spring SecurityはServlet Filterをベースに構築されており、リクエストはDelegatingFilterProxy→FilterChainProxy→SecurityFilterChainの順に処理される
- SecurityFilterChainは複数定義可能で、URLパターンごとに異なるセキュリティ設定を適用できる
- 認証はAuthenticationManager→AuthenticationProvider→UserDetailsServiceの流れで処理され、成功するとSecurityContextHolderに情報が保存される
- Spring Boot 3ではSecurityFilterChain BeanをLambda DSLで定義するスタイルが推奨(WebSecurityConfigurerAdapterは廃止)
- メソッドレベルのセキュリティは@PreAuthorizeで制御できる
次のステップとして、JWT認証を使ったREST APIのセキュリティや、OAuth2/OIDCによる外部認証の導入に挑戦してみましょう。
参考リソース
- Spring Security公式ドキュメント – Architecture(サーブレットアーキテクチャ)
- Spring Security公式ドキュメント – Servlet Authentication Architecture
- Spring Security公式リファレンス
- Spring Security日本語リファレンス – アーキテクチャー(Pleiades)
- Baeldung – Spring Security Custom Authentication Provider
- Marco Behler – Spring Security: Authentication and Authorization In-Depth
- Java Guides – Spring Boot 3: SecurityFilterChain Example


コメント